

On a day-to-day basis, extracting information from spreadsheets to a database in the application of a project is a very common task. And the source of that information is almost always MS Excel.
This task is known as “Extract, Transform and Load” (ETL for its acronym in English). More information regarding this procedure can be found on Wikipedia: Extract, transform and load. But although there is a lot of information on this link, it doesn’t provide a practical overview of how to do it.
On this occasion, I want to share how, with some of these tools, we can generate an ETL to fetch information from an XLSX file, do the necessary transformations, and insert it into a table in a database.
My current programming language is NodeJS, with the NestJS framework. As for databases, I’ve worked on MS SQL, MySQL, PostgreSQL, SQLite, MongoDB, and MariaDB, among others. So, I don’t have a clear preference (although I always lean towards MS SQL).
Tools
For this example, we will use the following tools:
- Start an application with NodeJS
- NodeJS, at least v12; however, this example uses version v16.13.2
- Express v4.18.2.
- Nodemon v2.0.20.
- Multer v1.4.5-lts.1.
- ExcelJS v4.3.0.
- Node-Postgres v8.8.0
- pg-hstore v2.3.4
- Sequelize v6.28.0
- Postman
- An MS Excel file with information in tables
- A database (any database, but in this example we will use PostgreSQL)
Description of the practical task to be carried out
Suppose we work for the company “Technology 3000” and we’re developing an app where many transactions will be carried out. One of our tasks is taking an Excel file, extracting data from it, and inserting it into the database for analytics purposes (let’s not worry too much about the client’s purpose).
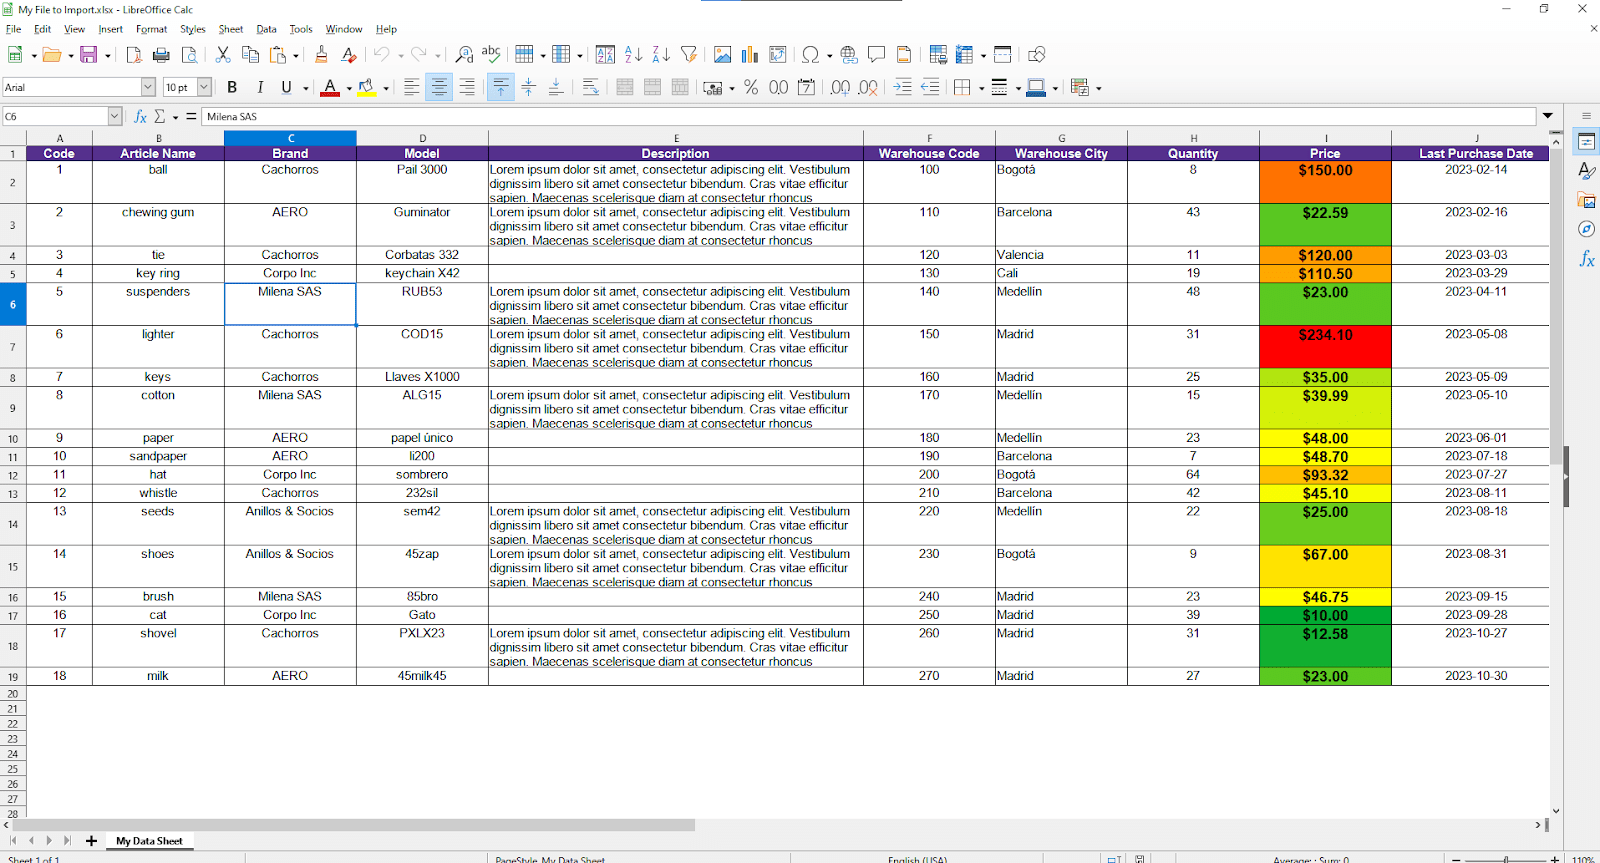
They give us a sample file called “My File to Import.xlsx,” and our technical leader also shows us the columns that we want to extract and the structure and definition of the entity in the database. With this information, we can start to organize how we’ll implement this requirement.
Structure and definition of the entity and data in the file
Ready, let’s start dissecting the file along with the information received from our leader. The entity in the database to be created is called “articles” and must be constructed as follows:
Entity: articles
| Column Name | Type | Length | Is Nullable? |
| name | varchar | 255 | NO |
| description | varchar | 400 | YES |
| city | varchar | 255 | NO |
| quantity | integer | NO | |
| price | decimal | 10, 2 | NO |
| lastPurchase | date | NO |
And a sample of the received file indicates that it looks as follows:
With the information received, we are going to prepare a JSON file that we’ll later use as a constant, which is a relation between the tables on the Excel file and the table on the database.
“my-excel.json”
[
  {
    "sheetName": "My Data Sheet",
    "sheetPosition": 0,
    "model": "article",
    "startRow": 2,
    "headers": [
      "Name",
      "Description",
      "City",
      "Quantity",
      "Price $",
      "Last Purchase"
    ],
    "columns": [
      {
        "position": 2,
        "seqName": "name",
        "type": "string",
        "isNullable": false
      },
      {
        "position": 5,
        "seqName": "description",
        "type": "string",
        "isNullable": true
      },
      {
        "position": 7,
        "seqName": "city",
        "type": "string",
        "isNullable": false
      },
      {
        "position": 8,
        "seqName": "quantity",
        "type": "number",
        "isNullable": false
      },
      {
        "position": 9,
        "seqName": "price",
        "type": "number",
        "isNullable": false
      },
      {
        "position": 10,
        "seqName": "lastPurchase",
        "type": "date",
        "isNullable": false
      }
    ]
  }
]
In this file, we can notice the interface that will help us to extract information:
- sheetName: It corresponds to the name of the sheet of the Excel file where the information to be extracted is located.
- sheetPosition: It corresponds to the position number of the sheet of the Excel file. In case the name of the sheet is unknown or dynamic, we can look at the position to extract the information. For example, the data may be located on sheet number 2 of the 4 that the file has.
- model: Model name in Sequelize where we want to import the information.
- startRow: Start number of the row where the data is located.
- headers: In the current example, this information is irrelevant; however, if you want to export some information from the database to an Excel file, you can use this arrangement to name the headers or titles of the table exported.
- columns: It’s the description of each column where the information can be found. This object contains the following information:
- position: The column position number on the sheet.
- seqName: The name of the Sequelize column or attribute it references.
- type: The type of data to be extracted. In this example, this is not in use, but for greater functionality it can be used to make transformations or verify that the extracted data corresponds to a data type.
- isNullable: The boolean indicating whether the data can be null. In this example, it is not in use, but for added functionality it can be used to check whether data exists in the column of the Excel sheet to make sure that there is data.
Creating the server in NodeJS
To start, we will create a simple server in NodeJS that will serve as an example of our product application.
You can follow this example here, or you can create your own. The idea is to have a basic server that is connected to a database and can receive HTTP requests. In this example, the command “npm init node-express-excel -y” is used, and then the necessary files and folders are created.
Project file structure
node-express-excel
├── src
|    ├── constants
|    |    └── my-excel.json
|    ├── sequelize
|    |    ├── models
|    |    |    └── article.model.js
|    |    ├── extra-configuration.js
|    |    └── index.js
|    ├── utils
|    └── index.js
|         └── data-type-function.js
├── uploads
|    └── xxxxx
├── package-lock.json
└── package.json
This would be an example app. We don’t focus too much on what each file does or how it works, but feel free to go through each of them in this example repository.
We focus on the document in “node-express-excel/src/index.js,” which starts the application and subscribes to the routes or endpoints (we won’t use a router in the example to keep it simple).
“src/index.js”
const express = require("express");
const multer = require("multer");
const sequelize = require("./sequelize");
const ExcelJS = require("exceljs");
const myExcelJSON = require("./constants/my-excel.json");
const fs = require("fs");

const upload = multer({ dest: "uploads/" });

const app = express();
const port = 3000;

async function confirmDatabaseConnectionOK() {
  console.log(`Verifying connection to database...`);
  try {
    await sequelize.authenticate();
    console.log("Database connection OK!");
    await sequelize.sync();
  } catch (error) {
    console.log("Failed to connect to database:");
    console.log(error.message);
    process.exit(1);
  }
}

async function init() {
  await confirmDatabaseConnectionOK();

  console.log(`Starting example in port ${port}...`);

  app.listen(port, () => {
    console.log(`Example of app listening on http://localhost:${port}`);
  });
}

// Route configuration. This can be handled in another file via a router for Express
app.get("/", (req, res) => {
  res.send("Hello World!");
});

app.post("/excel_file", upload.single("file"), async (req, res) => {
  try {
    let results = [];
    const file = req.file;
    if (!file) res.status(500).json({ error: "Missing attachment!" });

    const workbook = new ExcelJS.Workbook();
    await workbook.xlsx.readFile(file.path);

   // Logic to implement to extract data

    fs.unlinkSync(file.path);
    res.json({ message: "Data successfully inserted", data: results });
  } catch (error) {
    res.status(400).json({ message: error.message, details: error.details });
  }
});

init();
This is the code to run in the application. Let’s take into account the following numbered list before we start writing the logic to extract the information, since this is only for HTTP requests along with file extraction, database connection, among others.
- The express, multer, exceljs, and fs libraries are imported to use their methods.
- The sequelize library is configured in the “src/sequelize” file and imported into the app.
- The multer library will download files and save them in the “src/uploads” folder.
- The “my-excel.json” file is imported, which has the representation of what we want to extract from the Excel file.
- The functions “confirmConexionBaseDeDatosOK” and “init” are created. The first one makes the connection to the database in PostgreSQL, and the second one starts the server (depending on whether it managed to connect successfully).
- Two HTTP routes are configured on the server. The first is the “/” route, which only returns a message. The second is the path “/excel_file”, which until now, receives a single file and opens it immediately with the exceljsI library (so far, we have not extracted its data).
Reviewing our file “my-excel.json,” we notice that we have the representation of a spreadsheet or sheet in an array. If we wanted to extract information from more than one sheet of the same file, we could add it to the array, but in this example we only extract information from one sheet. Since it’s an array, we’ll start our code with a for loop:
“src/index.js”: inside the method block “/excel_file”
for (const mySheetJSON of myExcelJSON) {
    const { sheetName, sheetPosition, columns } = mySHeetJSON;
    // We extract the Excel sheet, so next we continue with the row-by-row data extraction
}
After we enter each sheet of our Excel representation (each element within the configuration array), we are going to map what we want to extract.
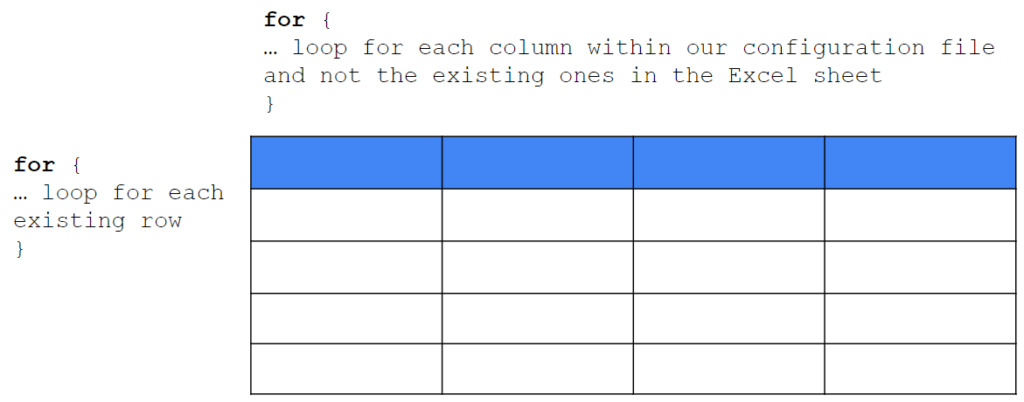
What we can see in the previous image are our next steps. In the first one, we have a loop, in which we’re going to iterate through the existing row in the spreadsheet (starting with the start row configured in the json through “mySheetJSON.startRow”).
The second step is to iterate through the columns, but not through the ones that exist in the file, but the ones that are of our interest, that is, the ones that exist in the “columns” field in my configuration json file.
“src/index.js”: inside the method block “/excel_file”
for (const mySheetJSON of myExcelJSON) {
    const { sheetName, sheetPosition, columns } = mySHeetJSON;

    const mySheetExcel = workbook.getWorksheet(
        sheetName !== "" ? sheetName : sheetPosition
      );

      if (!mySheetExcel ) continue;

      // We are going to extract the excel sheet with the help of the library
      // In case this sheet does not exist in the file, we go directly to the next cycle
}
This part is simple and straightforward: We use the library to find and extract the sheet we want. If it doesn’t exist, we continue with the for loop.
Before continuing, we are going to change the following for loop for an existing “eachRow” inside the object in “mySheetExcel,” since it is one of the features that the library gives us (we can also obtain an array of the rows and continue with this object).
“src/index.js”: inside the method block “/excel_file”
for (const mySheetJSON of myExcelJSON) {
  const { sheetName, sheetPosition, columns } = mySheetJSON;

  const mySheetExcel = workbook.getWorksheet(
    sheetName !== "" ? sheetName : sheetPosition
  );
  if (!mySheetExcel) continue;

  const myArrayDB = [];

  mySheetExcel.eachRow((row, rowNum) => {
    if (rowNum >= mySheetJSON.startRow) {
      const columnObject = {};
      for (const column of columns) {
        columnObject[column.seqName] = row.getCell(column.position).value;
      }

      myArrayDB.push(columnObject);
    }
  });
}
Starting with the row data, first, we check if we are in the correct row: All those that are in the beginning and subsequent row. Once we know that we are in the corresponding ones, we are going to create an object very similar to the entity of the table in the database “src\sequelize\models\article.model.js”.
Since we don’t know if all the rows of the sheet will be exported (suppose we want to extract only those that contain data or those that meet a certain condition), we create an empty array called “myArrayDB,” in which we will push the objects we want. And if there is a row that we want to skip, we simply create a condition and validate.
In the second for loop, we iterate through the columns that we have configured: we search for the position of the column and extract the data with the help of “getCell” and “value” from the exceljs library.
Now, with the data on the array, we only have to export it to the database. In our project, we have configured an entity and the connection to the database with sequelize, so we only have to search for the instance of the model that we want to upload (articles) and perform a “bulkCreate” that the library offers, leaving our code as follows:
“src/index.js”: inside the method block “/excel_file”
for (const mySheetJSON of myExcelJSON) {
  const { sheetName, sheetPosition, columns } = mySheetJSON;

  const mySheetExcel = workbook.getWorksheet(
    sheetName !== "" ? sheetName : sheetPosition
  );

  if (!mySheetExcel) continue;

  const myArrayDB = [];

  mySheetExcel.eachRow((row, rowNum) => {
    if (rowNum >= mySheetJSON.startRow) {
      const columnObject = {};

      for (const column of columns) {
        columnObject[column.seqName] = row.getCell(column.position).value;
      }

      myArrayDB.push(columnObject);
    }
  });

  const ModeloSeq = sequelize.model(mySheetJSON.model);
  const inserted = await ModeloSeq.bulkCreate(myArrayDB);
  results.push({
    model: mySheetJSON.model,
    inserted: inserted.length,
  });
}
With this we are almost done with our code. The only part missing in our exercise is to put everything inside a “try-catch” block, since we are working asynchronously, and we want to return a message to the user in case there is some type of error.
In this link: 02-node-express-etl-excel, you will be able to download the final exercise together with the other files (connection to the database, models, functions) so that you can test it on your computer or wherever you want. I leave you with some additional notes before finishing:
- At the beginning, the libraries and versions used are mentioned. Different versions can be used. However, the code would have to be refactored depending on how they affect dependencies.
- When we’re done reading the Excel file, we delete it from our uploads folder.
- Within the configuration file, each column of the array has the attributes “type” and “isNullable.” These attributes are not used in this example; however, the reader can use them or add more depending on the necessary validations and transformations to perform when extracting the data.
- Within the project is the file “data-type-function.js” with a single function that is exported. This function could be used in combination with the previous point to perform the necessary transformations on the data.
- This is a simple example without additional validations. In a production case, it would be necessary to validate the file format, the existence of the sheets, the existence of the columns, and other types of validations to return an explicit message with the necessary changes to be made by the user in order to continue.
- In this example, a direct insert is made. In production, it might be necessary to update already existing values, so it is up to the user to decide what methodology to use (execute the transformations on the server or leave it to the database through some stored procedure).
Testing
For our test, we will use Postman. Just open your desktop app and create a new request. This request will have a body in “form-data” format, where the only object that we are sending is a file (the Excel file in this example). The URL of the request will be our server with the specific route we work on.
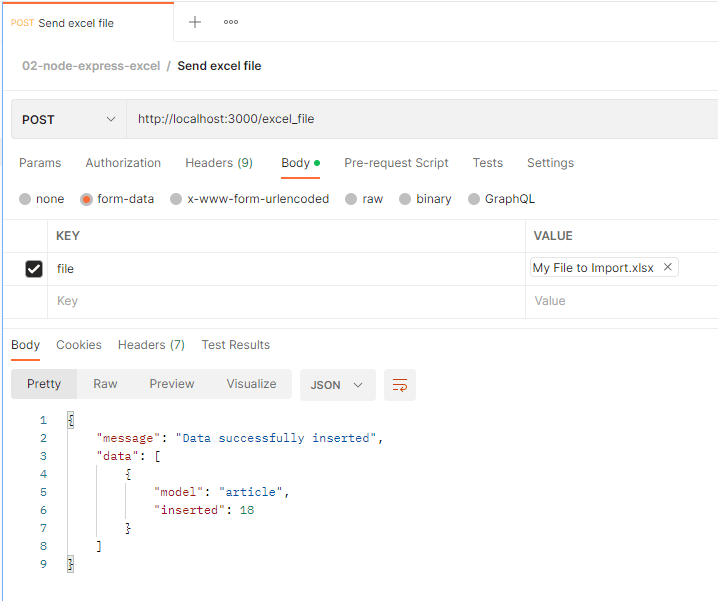
And since we are saving this data on a table on postgresql, we are going to use PgAdmin to check that our data was in fact successfully inserted.

Ending
We hope you enjoyed this example and it helped you solve a daily problem in current web applications. It is very common to receive a request where the client wants to take some information from an Excel file (or csv, json, xml, etc) to a relational database, and we, as developers, should provide a precise solution to fulfill their requirements.
Summary
At the end of the day, this will be the basis of the service and will evolve into something huge. But before adding more ingredients to this recipe, let’s see what we did in this tutorial:
- Create a simple NodeJS server.
- Add a Sequelize library and connect to a PostgreSQL database with an identity called “Article.”
- Create two routes for our app, one that will check that everything is OK and another one that will receive an Excel file.
- Open the Excel file with the ExcelJS library, which allows us to access their sheets, tables, and data.
- Iterate for each sheet on the file.
- Iterate for each row in the file, starting from the row indicated in the JSON file.
- Iterate for each column in the JSON file to extract exactly the data we want (row + column give you the exact cell where your data is).
- Insert the data array through a bulk insertion.
- Return a message to the client showing him what a great job you did.
Like we mentioned before, feel free to add any type of validation or a more complex transformation (string text format “ddMMyyyy” to date) or let us know what our next tutorial should cover. See you later guys!